Friday, February 22, 2013

Quick & Dirty Heatshrinked Cable Harness

I'm currently putting together a little project that requires me to connect a switch, motor and power supply in series.  If it was a permanent thing, I'd use a terminal strip and screw the wires in, but in this case I want to use some of the parts in other projects, so I decided to use connectors on everything.

Putting connectors on the devices themselves isn't a problem, it's just that you need an adapter of sorts to connect everything together.  So with what I had on hand I came up with this cable harness.  I use the term harness loosely as there are only three wires and three plugs.
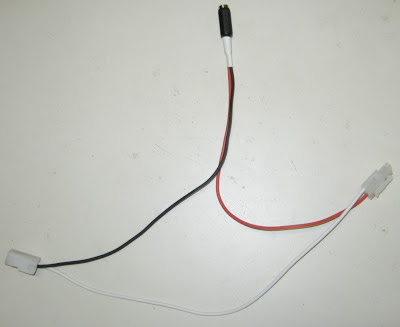
Simple Cable Harness
Wiring Harness

There isn't anything complex going on here, just daisy chaining three parts, but it's the finishing touches that make it more usable.  By folding the wires together and adding some cable ties the harness becomes more compact and gets some strain relief.

Simple Cable Harness
Harness with cable ties

To finish things up and make it a little neater, throwing a bit of heatshrink over the cables is a nice touch.  The heatshrink covers the sharp bits on the cable ties and also helps to keep the them from moving around.  This means you haven't got to ridiculously tighten the cables ties, as long as they're firm they'll be fine.

I've left an inch or so of wire protruding from the heatshrink, this makes it easier to connect to the incoming cables that may come from different directions.

Simple Cable Harness
Harness covered with Heatshrink

I love heatshrink, I always keep a reasonable selection on hand.  It can help make an average looking job just a little bit more professional.  A quick tip, printing room names and sliding them under bits of clear heatshrink on network cables is a great way to identify cables when doing a home network installation.  It gives nice results and you'll never get cables mixed up again.

Monday, February 11, 2013

Cheap Magnifiers For Inspecting Surface Mount Soldering

Over the last couple of months I've been trying to learn more about the theoretical and practical aspects of surface mount soldering, and one of the biggest hurdles I've come across is inspecting the resulting solder joints due to the small size of the parts.  Ideally I'd like some sort of microscope but at the moment I don't have the room for one, and on top of that I'd like to keep things relatively cheap.  With that in mind I've gathered some small, cheap, tools that make the job a little bit easier.

The first inspection magnifier I used was an old 10x jewellers loupe that belonged to my grandfather (shown below on the left).  It allows me to see a lot more detail but it's slightly cloudy and makes some finer detail hard to see.  I decided to buy a selection of new ones from Deal Extreme.  Although buying cheap tools online can be a bit hit and miss, something like this that's been around for a long time, and is a simple design is usually a safe bet.

For under 8 dollars (postage included) I was able to pick up the two jewellers loupes on the right in the image below.  The single lens model is a 30x magnifier and the dual lens loupe has 10x and 20x lenses.  They're a lot clearer than the original loupe I had, and having a range of different magnifications gives me some flexibility depending on what I'm looking at.  They even come in their own little case.

Jewellers Loupes
Jewellers Loupes

Jewellers loupes are handy but sometimes you need a little bit more magnification, for these situations I bought something called a pocket microscope.

Pocket Microscope
Pocket Microscope

The pocket microscope has a magnification factor of x100 and a built in LED to illuminate the subject when the microscope is opened, and for 9 dollars I was quite impressed.  The depth of focus is quite small, but the focussing dial allows the focus to be changed easily.  The magnification is quite impressive, for example, the detail on a human hair is just visible.  As an aside, I think this would be an ideal inexpensive gift for any kids that show an interest in science.  Who wouldn't want a portable pocket sized field microscope?

There was however a manufacturing error in the microscope.  The wire that attaches to the battery terminal sticks out and doesn't have any insulation over it.

Battery Compartment
Battery Compartment with Bare Wire

When the battery was inserted, the wire cut through the protective coating on the battery and shorted the positive case to the negative terminal.  The first indication of this was the battery getting hot.  Pushing back the tab that the wire is soldered to fixed the problem as this lowered the wire at the same time.  Although it should be fine, I don't feel comfortable leaving the batteries in permanently and make sure that I take them out after each use.

AA Battery
Damaged AA Battery

I'd love to be able to show some photos of what I can see, though the eyepiece but am unable to.  I recommend buying some magnifying tools like this.  By no means are they a replacement for a good stereo microscope but they're inexpensive and come in handy in numerous situations.