Showing posts with label Hack. Show all posts

Saturday, June 4, 2016

Putting The Back On A Watch

Ever taken the back off a watch and you didn't know how to get it back on?  Ideally you'll want to find a watch press that has the correct size dies.
Watch Press
Watch Press
But, in a pinch, you can use a normal vice.  I have to warn you though, if you're not careful, you might end up breaking your watch.  Don't say you weren't warned.  It's not my fault if your watch ends up in 1000 different pieces.

The first step is to find a nice flat piece of metal, this is placed against the back plate.  In my case I used a large washer with a small hole in it.  You'll then need to find a stiff piece of rubber that pushes up against the front of the watch.  I found what I think was a rubber screw on foot from something like an old piece of furniture.

This all gets placed in the vice.  Make sure it is centred in the jaws as the whole point of this is to exert a gradual uniform pressure on the backplate to clip it back into place.

Vice
Watch in Vice

The next step is the one that will make you sweat and is something I can't describe.  If you've used a vice a lot you'll get a feel for how much pressure it's exerting by the resistance offered when turning the handle.  You want to gradually turn the handle while observing the watch from the side.  The gap between the backplate and the front will slowly close and then all of a sudden it will snap back into place.

Vice
Watch Compression Stack

So yeah, it'll work, but it's high risk.  You're better off going to eBay and searching for a watch press.  They cost something like $16 Australian delivered from China for a cheap one.  It'd be handy to have a die to clamp connectors together too, you know like the old db9 ribbon cable ones.

Saturday, February 6, 2016

Turning a Dash Cam into a Surveillance Camera

I've had to come up with a solution to a strange problem.  A relative thinks that someone is stealing their pot plants at night.  To see what's really going on a surveillance camera would be great.  The main problem is that most of the options on the market are just cameras that send an image back to central location for monitoring or recording.  This can be via a wireless connection or physical cables.  I don't want that, I want something really simple.  There's no internet connection or wireless network at this place, so that rules out a lot of options.  I can already hear people saying things like, Raspberry Pi, zone minder, WiFi dongle, IP camera, webcam.  Totally agree, if I was living there and had time to tinker, that's probably what I'd do, but this isn't one of those projects I'm doing because I love it, it just needs to get done.  Besides, I can see what would happen.  Project goal is to install a surveillance camera, spend a week in Linux trying to figure out why the webcam drivers don't work, or tracking down that the Raspberry Pi is restarting because the power cable isn't thick enough for the current it needs.  Screw that.

There is a far easier solution though, and luckily I had all the parts.  Take a car dash cam and power it from mains electricity though a timer.  Boom, done.  Well, not quite.

dash cam
Dash cam running on mains power
My father happened to have a spare dash cam he bought cheaply at ALDI.  It's not state of the art, but image quality is good, and it has some nifty features that will come in handy.  The display isn't of much use, but for aligning the camera it will be useful.

The plan is to have the timer come on at 6 pm and go off at 6 am.  This will active the camera in exactly the same way as turning on a car ignition.  Recordings that long will take up a lot of disk space, but luckily this model has a option to only record when movement is detected.  So most of the night the camera won't be recording anything.  If in the morning the relative suspects something has happened during the night, all they need to do is turn off the power to the camera.  I'll then inspect the footage when I'm available.

dash cam
Flip down display
The camera has 6 IR LEDs on the front that come on when it gets dark.  They seem to be rather good LEDs that don't bleed into the visible spectrum.  I can't imagine that they'll do much to illuminate a yard, but, we'll soon find out.

dash cam
IR LEDs
The original plan was to use a USB wall wart  from a phone to power everything, but as it turns out, the USB port is for charging and transferring data to a computer.  When a cable is plugged in the camera won't turn on.

dash cam
USB Port
To solve this I used a variable switch-mode power supply I had.  After testing the polarity and voltage of the power supply the camera came with, I replicated that with variable supply.  When connected to the camera with the appropriate plug everything worked fine.  Turn on mains power, and the camera enters standby mode read to capture any motion.

dash cam
Power Port
The timer doesn't really warrant a mention.  It's a simple mechanical timer that if needed my relatives are capable of setting.

The camera is now installed and waiting.  Let's see if we can catch this horticultural hijacker, blossom bandit, perennial prowler, seedlings stealer, leaf larcenist.  Sorry, couldn't help myself. :-)

Thursday, July 17, 2014

Hacking Together a Replacement Switch for an LED Lantern

My sister recently asked me to have a look at an LED lantern she uses around the house, mainly to lock up her chickens at night.  It had been dropped and the switch mechanism damaged.  She wanted to see if anything could be done without spending too much.

Lantern
Arlec CL100 Lantern
The switch is a rotary type and is on the top.  It's designed to be removed to replace the light.

Switch
Lantern Switch
Removing the switch is done by unscrewing the top.  This is where the damaged occurred.  The light was dropped on this corner, causing a large piece of the plastic thread to break off.  I considered glueing it back together, but after playing around with for a bit I got the impression that if I didn't get it exactly right it would easily break again.  So I decided to replace the top entirely.

Switch
Switch Damage
So how do I go about doing that?  Let's take a look inside.  The first thing to notice is the four terminals on the white plate.  The inner two are connected to the LEDs, while the outer two are threaded rods that are used to hold the light together and at the same time connect the LED's to the battery in the bottom of the lantern.

Contacts
Battery and LED Light Contacts
Normally the switch on top electrically connects these terminals to operate the light.  The functionality of this is what needs to replicated.

Contacts
Switch Contacts
I had an idea of how to replace the top, but I needed to remove the metal cowling on the top to make more room.  It seems to only be held on by a rubber retention ring.  I don't actually know the purpose of it.  It seems to be decorative.

Cowling and retention ring
The outer thread can be seen, and now that the cowling has been removed there is more room to work.

Outer Thread
Outer Thread
While we're at this point I'll take a minute to show the light bulb.  It's made of 4 PCBs soldered together to make a rectangular tube.  These boards hold the LEDs and current limiting resistors.  If you remove it, pay attention to polarity, like most LEDs it'll only work one way.

LEDs
LED assembly
The light is passed through a diffuser to create a more even spread of light.

Lantern Diffuser
Diffuser
Anyway, back to fixing the light.  I simply added an old switch I had in series with the battery and LED terminals.  I added as much insulation as I could in case a wire came loose, but everything seems fairly firm.

Wiring
New Wiring
That's all well and good, but you can't have the switch and wires hanging loose.  They need to be held rigidly to prevent damage.  After thinking about it for a bit I came up with the perfect replacement.  An end cap for PVC storm water pipe.  It's just the right size and is made of a relatively strong plastic.  The end cap was attached to the lantern by drilling some holes around the perimeter and threading cable ties through them.  I could have riveted it on, but it would have made it hard to fix anything if it breaks in the future, besides that, it could have cracked the plastic.  I could have also used self tapping screws, but after you insert and remove them a couple of times the thread in the plastic would be damaged.

Switch
PVC End Cap Cable Tied In Place
It's not the most elegant of repairs, but it was cheap and quick.  This is one of those occasions that having a 3D printer would have been handy, but it would have taken longer to design and print the part than my quick fix took.  All up, this cost about 3 bucks and about three hours of time while watching TV, so we'll say an hour of actual work.

Thursday, May 1, 2014

DIY Eye Terminal Proof of Concept

The project I'm currently working on requires me to use eye terminals, and I'm unsure if what I'm able to buy will suit my needs.  So as a contingency plan I thought I'd see if I could make some.  I started by inspecting some terminals I already had.  The construction of the terminal looks pretty simple, a tube of metal is stamped shut and a hole is most likely punched through the end.

Eye Terminal
Eye Terminal
Eye Terminal
Eye Terminal Wire Entry

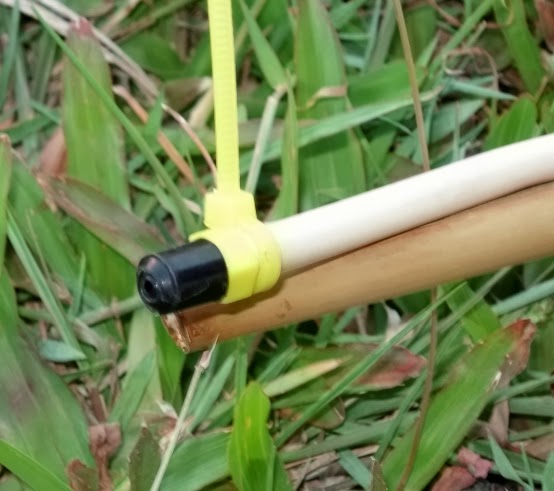
To replicate this I thought I'd do a quick proof of concept test to find out what issues I might be overlooking.  To start with, I took a piece of 6 mm copper pipe and cut off a piece about 40 mm long, half of this was then closed by clamping the pipe in a vice.  A piece of wire was inserted into the other end of the pipe to prevent deformation.

Copper Pipe
Copper Pipe Flattened

Copper Pipe
Copper Pipe Flattened

Copper Pipe
Copper Pipe Flattened

A hole was then drilled into the end and it was sanded to a round shape.

DIY Eye Terminal
Drilled and Sanded Terminal

DIY Eye Terminal
Eye Terminal Wire Entry
From this quick test it's easy to see where the problems are.  First of all the wall thickness of the pipe I used is too big.  It doesn't allow larger cables to be put into the tubing.  The other problem is that the professionally manufactured tabs are stamped.  This spreads the metal out to form a wider tab.  I just don't have the equipment to do this.

The conclusion I came to is that this solution won't work in my application, but would be better suited to a project with larger cables.  If a half inch pipe were used the tab would be wider and also allow larger cables to be used.  I should be able to buy what I need, but it would have been nice to have a back up plan.

Friday, March 7, 2014

DIY Relay Brackets

I finally got back to a long term project I've been working on.  I'm building a small control box containing relays that needs to be waterproof.  The layout and how to mount everything is sorted except for the relays.  I'm using automotive relays that have a metal tab coming out the back with a single hole.  This makes them easy to mount but if any force is put on the cabling the relays could rotate and work loose.  I'm using nylock nuts so they wont come loose and the spade terminals on the relays will have insulated boots so things can't short out.  Having said that though I want this to be reliable, work for as long as possible, and require little maintenance.  So adding some support for the realys seems like a good idea.

Relay Bracket
Relay Brackets
My solution was to pop rivet two small aluminium pieces to either side of the relays to hold them in place so the can't rotate.  I put my OCD tendencies to the side on this one and used some of the holes that were already in the plate, so unfortunately everything isn't symmetrical, but it'll still work.

Relay Bracket
Relay Brackets
I'll keep you posted with the progress of the project but at the rate I'm going I might get it done by Christmas.  I've been having trouble finding time to do anything lately.

Monday, February 24, 2014

Hastily Assembled Shower

Due to a hastily arranged bathroom renovation my productivity has been a little less than usual this week.  It's hard to do things with tradespeople around.  So I thought I'd cheat on this post and show something I threw together last week.  One of the problems with a bathroom renovation is you have nowhere to shower while it's in progress.  With only a couple of days notice I needed to put together a shower, and because I'm a cheapskate I thought I'd use what I had on hand.

Sprinkler
Sprinkler Shower
I got lucky and found a sprinkler base with two holes drilled though it.  This made it ideal to screw to the beam of the patio outside.  The head on it wasn't ideal, but I did have one that was a lot more like a shower.

Sprinkler
Garden hose attached to the sprinkler
An attachment to connect a garden hose was then added.

Hose
Excess hose wrapped around beam
The hose I found was too long, so instead of cutting it to the right size, the excess was wrapped around a beam.

Water pipes
Shower combination
I was willing to take cold showers, it's summer in Australia at the moment so showering outside in cold water isn't too much of a problem, but by a stroke of luck there was an old hot/cold shower combination nearby.  So a few adapters later I had a nice warm shower running.  It took me about half an hour and cost me nothing except for a bit of thread tape.  By the way, the secret to plumbing is thread tape, know how much to use and what type and you'll never have a leak again.

Wednesday, January 22, 2014

Waterproof Enclosure Mounting Plate

A project I'm working on requires a waterproof enclosure, but there's no way to mount all the parts needed inside the box without drilling through it, but there are 4 mounting posts in the corners.  What's needed is a metal plate that all the parts can be mounted on, and then that plate can be screwed into the supplied screw holes.  You could just drill through the box but then you have the headache of sealing the screws and making it watertight again.  I didn't want to do this, after all I went and bought a nice enclosure with a rubber seal so I didn't have to worry about this.

Now the obvious solution is to just buy some sheet metal and cut a plate, which is kind of what I did.  My storage space is somewhat constrained and I don't have space for a lot of offcuts.  What I ended up doing was buying a small nail plate from the local hardware store for around a dollar.  It was almost the exact size I needed and didn't need much material removed at all.

Waterproof enclosure with a mounting plate

Saturday, January 11, 2014

Keeping Pets Cool During a Heat Wave with an Improvised Misting Spray

Recently I had to look after my sister's chickens while she was away on holidays, and on a hot day (35 °C) while I was at work one of them didn't make it.  Her partner added some shade cloth to their pen to fix the problem.  This made a big difference and largely solved the problem, but I was worried about the forecast for the next weekend I was looking after them and wanted to add a small water spray to keep the enclosure cool.  The forecast was for a day of 40 °C, it ended up being about 43 °C.  The idea is pretty basic, put a sprinkler jet on a timer and put it in the pen.  If the chickens get wet that's great, but even if they don't, the water evaporating from the mist and from the ground, will drop the temperature.  My first attempt gave mixed results.

Misting Sprinkler
Mister
A hose connector was added to a bit of garden pipe and then a flexible tube was connected to this.  The tube was attached to a garden stake and a 21 L/hour sprinkler jet was added to the end.  The jet was then placed at a high point in the pen.

Garden Hose Connector
Hose connector
Sprinkler Jet
Sprinkler Jet
This was set up on a timer and let run for a day to see the results.  Initially it worked well, but when I returned the next day the tap was off.  It seems a helpful neighbour turned off the system after it failed and was squirting a jet of water in the air.  The problem was twofold,  The extreme heat softened the flexible hose, and then the high domestic water pressure blew it off the black hose.  I put it back together and then the sprinkler jet was blown off the end.  A cable tie was used to reattach it to the pipe, but I didn't really have much confidence in the set-up any more.  I bought a pressure reducer to drop the pressure to 100 kPa, but at that point I had already decided to redesign the whole thing to be a little more reliable.

I'd already bought the pressure reducer so I decided to use it.  It was added after the timer.

Garden Water Timer
Tap Timer with a pressure reducer
This is the result.  The whole arrangement is basically metal.  It consists of a brass jet inserted into a copper pipe, this is connected to a fitting to couple it to a garden hose.  The pipe was bent using a standard spring bending tool.

Misting Sprinkler
Improved Mister
An old spike sprinkler fitting was repurposed to connect the garden hose to the copper pipe.  A standard hose connector was put on one side, and a compression fitting was added to the other.  Thread tape was also used to get a good fit.

Sprinkler Base Fitting
Connecting the copper pipe to the hose with a sprinkler fitting
The other end was squashed shut in a vice and soldered shut.  A hole was drilled in the pipe, all filings were flushed from the pipe, and the jet was inserted.  It was able to cut its own thread, but if it needed it I would have soldered it in place, that wasn't required though.

Brass Sprinkler Jet
Brass jet in copper pipe
During my research for this I looked into professional misting systems that are used specifically to lower temperatures, and someday I'd like to have a reason to use them.
Ideally I would've liked a jet with a lower flow rate, but this was all I could get my hands on.  It made things a little muddy, but I'm glad to report that all of the chickens made it through the day.

Saturday, July 13, 2013

Confined Space Tool Bag/Sack

I recently had to do a bit of work under the house that required quite a few tools but found it too cumbersome to carry them individually.  It was a reasonably small space and I had to crawl quite far to get there.  I was however lucky enough to have just the right thing for the job.

Under a House
The 3 foot clearance under the house
I happen to eat a fair bit of rice, and being a cheapskate, I like to buy it in bulk.  This means I'm starting to get quite a collection of the sacks that the rice comes in.  They seem too good to throw out and I use them when I can.  If I had a need for them I reckon that they would make some nice couch cushions, but in this case the bags were perfect for carrying my tools.

Tools
Ad hoc Tool Bag
Why not use a proper tool bag for the job I hear you ask.  Well, I don't do this kind of thing too often and it would just take up space I don't have, besides, I already had this on hand.

The bags even come with a handy little zip on the top to stop things falling out.  This made the job so much easier.  I was able to throw my tools in the bag and crawl to where I needed to be without too much hassle, and because everything was secure in the bag I didn't have to worry about losing things. 

Rice Bag
Zip on the rice bag

Thursday, July 4, 2013

Installing Hollow Wall Anchors With Common Tools

I recently had to install a new TV antenna point for my Grandmother and I felt the wall was too thin and weak to screw the wall plate to.  The easiest thing to do was just use some hollow wall anchors.

Hollow Wall Anchor Installation
Wall Anchor Before Tightening
They're easy to use.  The anchor is inserted into a hole in the wall large enough for its body and then expanded until the bendable metal tabs force the fitting against the sheeting and lock it into place.

Hollow Wall Anchor Installation
Wall Anchor After Tightening
Installing the fittings can be done a couple of different ways.  If you're going to be using a lot of them, go out and spend $30 on the correct tool for the job.  It's kind of like a pop rivet gun, except it pulls on the head of the screw to expand the tabs in the wall.  I only needed to use a couple of anchors so I decided to try a different (cheaper) method.

Insert the anchor and screw into the hole and lightly tap it into place with a hammer to push the locking teeth into the wall sheeting.

Hollow Wall Anchor Installation
Wall Anchor In Position
The metal tabs on the back can then be expanded by tightening the screw.  There is a slight problem though, tightening the screw takes quite a lot of torque, and if you're not careful the anchor may just spin around without tightening the screw.  To prevent this, a second screwdriver is wedged against the locking teeth on the front of the fitting.

Hollow Wall Anchor Installation
Using Screwdrivers to Tighten the Wall Anchor
With the second screwdriver against the locking teeth the screw can be tightened until the anchor is locked into place.  At this point you can remove the screw and securely attach whatever you want to the wall.  This method does require you to put a bit of force onto the screwdrivers which can be a bad idea.  Whenever forcing something with a screwdriver make sure your other hand is positioned so it wont get stabbed if the tool slips.  Be careful.

Job done.  My Grandmother has now made the switch to digital TV and is getting a good signal via a neat antenna point on the wall.  Installing anchors this way is really easy once you get the hang of it, but I'd only recommend it for the occasional fitting, for bigger jobs, get the right tool.  Besides, I'll take any reason to get a new tool (toy).

Sunday, June 23, 2013

Flaring the End of A PVC Pipe

Recently I've been building a chicken coop for my sister and I've finally come to the end of the project.  One finishing touch that still needs to be done is for a downpipe to be fitted to the guttering.  To keep costs down I'm trying to use materials that we already had, and it turns out my sister had a piece of 40mm PVC pressure pipe from another project.  As it turns out it wasn't quite the right size, so I thought I'd document how to make the pipe bigger.

PVC Pipe
Original PVC Pipe
Finding a fitting to connect the pipe to the guttering isn't easy as it's 40 mm pressure pipe.  40 mm isn't a standard size for guttering downpipe, so I found a fitting that was almost the right size and decided to flare the end of the pipe to fit it.  I think the fitting was for a floor drain, but it'll do what I want.
Flared PVC Pipe
Flaring the PVC Pipe
Flaring the end of the pipe is easy.  You need something round and tapered, and a heat gun.  The pipe is evenly heated at the end by rolling it backward and forward under the opening of the heat gun until it becomes pliable.  It doesn't need to be too soft, just soft enough to insert the fitting, but before that can be done you need to flare the pipe as the fitting initially won't fit into it.

The only tapered thing I had that was the right size was a coke bottle.  After filling the bottle with water so it wouldn't compress, it was pushed against the pipe to expand the soft end.
Flared PVC Pipe
PVC Pipe and Fitting
Once the pipe is slightly expanded, the fitting can be inserted.  I left the fitting in the pipe until it cooled naturally.  I figured cooling the pipe too fast might not be a good idea.  Better to be safe than sorry.
Flared PVC Pipe
PVC Pipe with Fitting in place

Flared PVC Pipe
PVC Pipe with Fitting in place
It's a really tight fit but it still needs a fastener to hold it in place.  A pop rivet is ideal but a screw will also do the job.  After putting a couple of screws into the sides it was then attached to the gutter with 2 more screws.  Pop rivets would have been better but you do the best with what you've got.

To save an extra couple of bucks I put a bend in the bottom end of the pipe with the heat gun instead of buying elbows. Below is a shot of the finished chicken coop with the downpipe fitted.  There are a few things I wish I'd done differently, but as it is I'm pretty damned happy with it.
Chicken Coop
Down Pipe Fitted, Chicken Coop Finished